Grade Crossings
There are three roads that cross the tracks on the module. All three include multiple crossings; one with two, one with three and one with four. For the VE, I bought two types. Part # 118 includes 12 two lane crossings for 90 degree crossings and part #132 that includes two angled crossings. These are really nice laser cut wood crossings that work perfectly with Code 83 rail. They are a little thick for Code 70 and probably a bit thin for Code 100.
In order to get the outer boards to snuggle up to outside of the rails, one of the back side corners needs to be shaved down to clear the spike heads molded into the flex track. As shown below, I used an X-acto knife followed by a bit of sanding to even things out.
The grade crossing were stained with Builders-In=Scale "Silverwood" and glued in place with Aleene's Tacky Glue.
Roads
I spent a lot of time looking a road building tutorials on YouTube. Ultimately, I used a combination of several how-to videos to create my asphalt roadways. In the past, I have always used sheet styrene to create roads. While it is easy to work with, it is difficult to achieve anything but manicured roadways with going through several steps to achieve some texture, cracking and erosion. My era and location dictated that most of the roads in the rural area I am modeling would suffer from poor maintenance.
1/8" cork was used to make the roads. It was cut 22 scale feet wide and tapered with sandpaper were the asphalt meets the grade crossings. A X-acto knife was used to chip away along the sides of the cork to show signs of erosion and deterioration along the shoulders. It was also glued in place with tacky cement. The deterioration is exaggerated at this point but once the shoulder is blended in the surrounding scenery the effect will be much more subtle.
Coloring the road way can be a challenge. My paint preference, with the exception of locomotives and rolling stock, is craft paint. I tested out several colors to come up with a base color. I decided upon the Apple Barrel brand #21490E "Pavement" shown in the middle of the photograph. Later, Apple Barrel #20536E "Country Gray" applied with a dry sponge will be used to lighten (age) the asphalt and add more texture. Additional weathering will be done with more craft paint and powdered pigments.
The road painted with the Apple Barrel "Pavement" along with some gray applied with a sponge. More weathering will be applied once the shoulder is in place.
Fascia
Details
The layout is getting to the point where scenery and details can be added. Here is a little MOW storage area that is accross the street, to the East, of the depot.
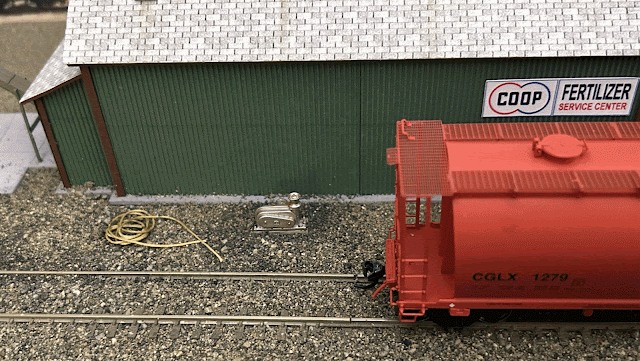
Another little detail is the car puller located next to the Redbanks fertilizer dealer. I still need to add a shelter to protect the puller from the weather.
Finding vehicles to fit the era can be difficult. This 1979 Chevy pick-up fits right in. I owned a 1976 version of this same 4-wheel drive pick-up with a 4-speed transmission and the optional 350 V-8. It is still one on my all time favorite vehicles.
Rolling Stock Additions
I keep an eye out for rolling stock that is appropriate for the layout. I found this Atlas Agrico 3-Bay cylindrical hopper on ebay.
As always your comments, suggestions & questions are welcome


No comments:
Post a Comment